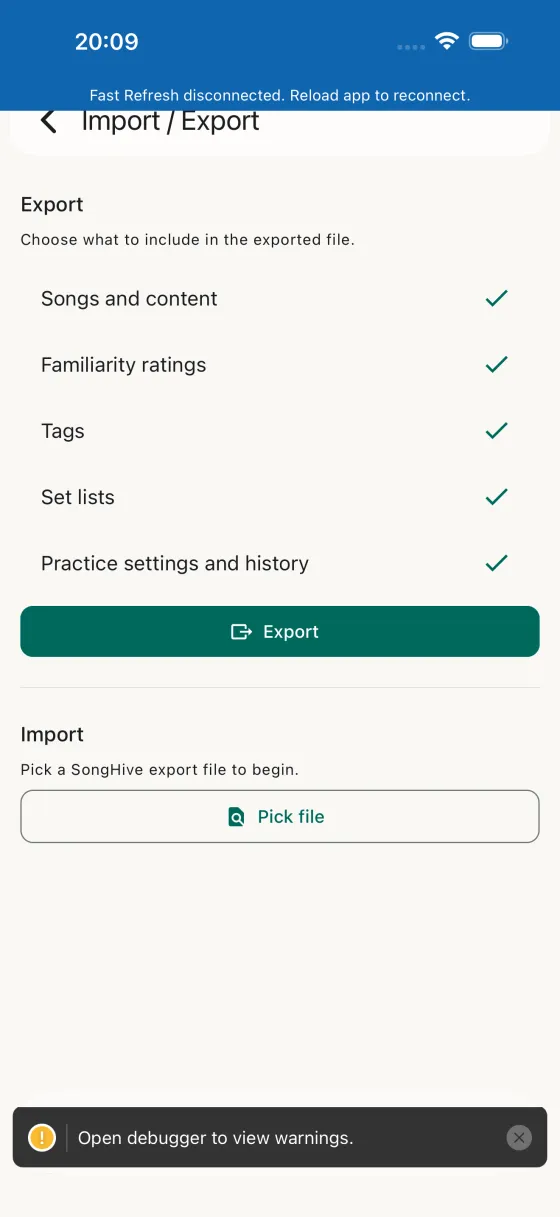
Import / Export, open from Settings → Data
How to get here
Open Settings and tap Import / Export under the Data section. The screen has an Export card at the top, an Import card below it, and an Import from BandHelper card at the bottom.
Exporting
Five sections are listed with check marks — tick any combination:
- Songs and contentEvery song with its chords, lyrics, and notes — and your custom field definitions along with each song's values for them, so a restored backup doesn't leave data behind a field that no longer exists.
- Familiarity ratingsPer-song Lyrics and Music star ratings.
- TagsTags and the songs they're attached to.
- Set listsEvery set list, song order, and per-song field selections.
- Practice settings and historySession size, scheduled intervals, and the full practice log.
Tap Export and Song Hive builds a .songhive file containing only the ticked sections and hands it to iOS's share sheet.
Importing
Tap Pick file and choose a .songhive file from anywhere iOS's file picker can reach (Files, iCloud Drive, Dropbox, Google Drive, a share-sheet handoff). Song Hive inspects the file, shows you which sections it contains, and asks how to bring them in:
- MergeUpsert songs, union tags, skip duplicate practice log entries. Nothing is deleted.
- OverwriteDelete songs and set lists not present in the file; wipe the practice log and re-seed from the file.
Songs in the file match against your library by id first, then by name + artist, so a cross-device import lines up with the same songs you already have.
You don't always have to go looking for the file. AirDrop a .songhive file to your device, or share one to Song Hive from another app, and it opens straight into this import screen — no need to save it to Files and hunt for an Open In option first.
Importing from BandHelper
Moving over from BandHelper? On the BandHelper website, open Repertoire → Songs and tap Export at the bottom of the page — it hands you a tab-separated text file of your whole song list. Get that file onto your device (AirDrop, Files, iCloud Drive), then tap Pick BandHelper file on this screen.
Song Hive reads the file and shows what it found before touching your library: how many songs, any rows it couldn't read, which columns fill a built-in song field, and the custom fields it will create. Then tap Import.
- Title, Artist, TagsLand on the song directly. Tags are created as needed.
- Lyrics, Chords, NotesGo into the matching tabs on the song editor, line breaks intact.
- TempoBecomes the song's BPM.
- Capo, TuningBandHelper has no column for either, so if you kept them in a custom field named Capo or Tuning (or Capo fret, Guitar tuning) Song Hive fills the song's real capo and tuning instead of making a text field out of them — which is what makes the song list's capo and tuning filters find them afterwards. Capo reads
2,3rd,fret 5andnone; tuning readsDADGBEorD,A,D,G,B,E, the same six notes spaced out (Eb Ab Db Gb Bb Eb), and the wordstandard. - Key, Time signature, Duration, Starting pitchSong Hive has no built-in field for these, so rather than drop them it creates a short-text custom field for each one that has a value.
- Your BandHelper custom fieldsEach column becomes a Song Hive custom field named after it — long text if any song's value runs over several lines, short text otherwise. A field you've already defined with the same name is reused rather than duplicated.
A column Song Hive recognises is used up: it never also becomes a custom field, and the odd value it can't read (a tuning written as open G, say) is dropped for that song rather than half-filling a field — the summary at the end tells you how many, per column. A column whose values it can't read at all is listed as skipped in the preview, so you can see before you tap Import that nothing will come of it.
Document, recording and MIDI columns are skipped — they refer to files and presets that only exist inside BandHelper. Songs are matched by name + artist the same way a .songhive merge is, so importing the same file twice updates rather than duplicates, and a row without a title is reported at the end without stopping the rest of the file.
Free-plan awareness
If you're on the free plan and the projected library size after import would exceed the 15-song limit, Song Hive shows an upgrade prompt (or an "import the first 15" option) before touching your library.
A BandHelper import does the same arithmetic on the songs that would be new to your library, and gives you three choices: Import first N brings in as many as still fit (all 15 into an empty library, 5 if you already have 10) and tells you how many were left out; Unlock unlimited opens the purchase, and the full import carries on by itself once it goes through; or Cancel.
Legacy files
Older exports from before the section picker existed are still accepted. Song Hive detects the legacy format automatically and pre-checks the songs, familiarity, and tags sections on the way in.
Alongside iCloud
Import / Export is deliberate and file-based; iCloud sync is automatic and continuous. Use iCloud for day-to-day device-to-device; use Export for manual backups or selective transfers.